Snowflake Introduction
In this tutorial, we would be going through the process of setting Snowflake with sample warehouse. Next, we would be loading a data file onto this warehouse. Last, we would be running sample queries on this warehouse.
Create Snowflake user profiles
Snowflake uses roles to control the objects (virtual warehouses, databases, tables, etc.) that users can access:
- Snowflake provides a set of predefined roles, as well as a framework for defining a hierarchy of custom roles.
- All Snowflake users are automatically assigned the predefined PUBLIC role, which enables login to Snowflake and basic object access.
- In addition to the PUBLIC role, each user can be assigned additional roles, with one of these roles designated as their default role. A user’s default role determines the role used in the Snowflake sessions initiated by the user; however, this is only a default. Users can change roles within a session at any time.
- Roles can be assigned at user creation or afterwards.
You can read more from documentation.
Sample script for creating users & roles
To help with this workshop, here is the script for creating user profiles
Data Loading Steps
Here is the process for loading external data files (CSV, JSON or Parquet):
- Create File Format Objects
- Create Stage Objects
- Stage the Data Files
- List the Stages Data Files
- Copy Data into Target Tables
- Resolve Data Errors if any
- Verify loaded data
- Remove successfully loaded data files
Sample script for creating staging area & data loading
Here is the script for loading data into Snowflake. Please execute the script up to creation of staging area.
Then we need to put the json data file using either snowsql cli tool as:
1
snowsql -a wg30470.us-east-1 -u etl_user -r anl_write -w etl_write_xs -d sflk_s -s dim
Or, we can use a python script to load this json file onto staging area.
1
load_utils/load_json.py suresh of96327.us-east-1 etl_write_xs sflk_s dim
After loading the file to staging area continue with COPY INTO command and see the results of the relational table. In the example above, the data files are loaded onto internal staging area of Snowflake before being copied into the final table.
We could also directly use external staging area in Snowflake.
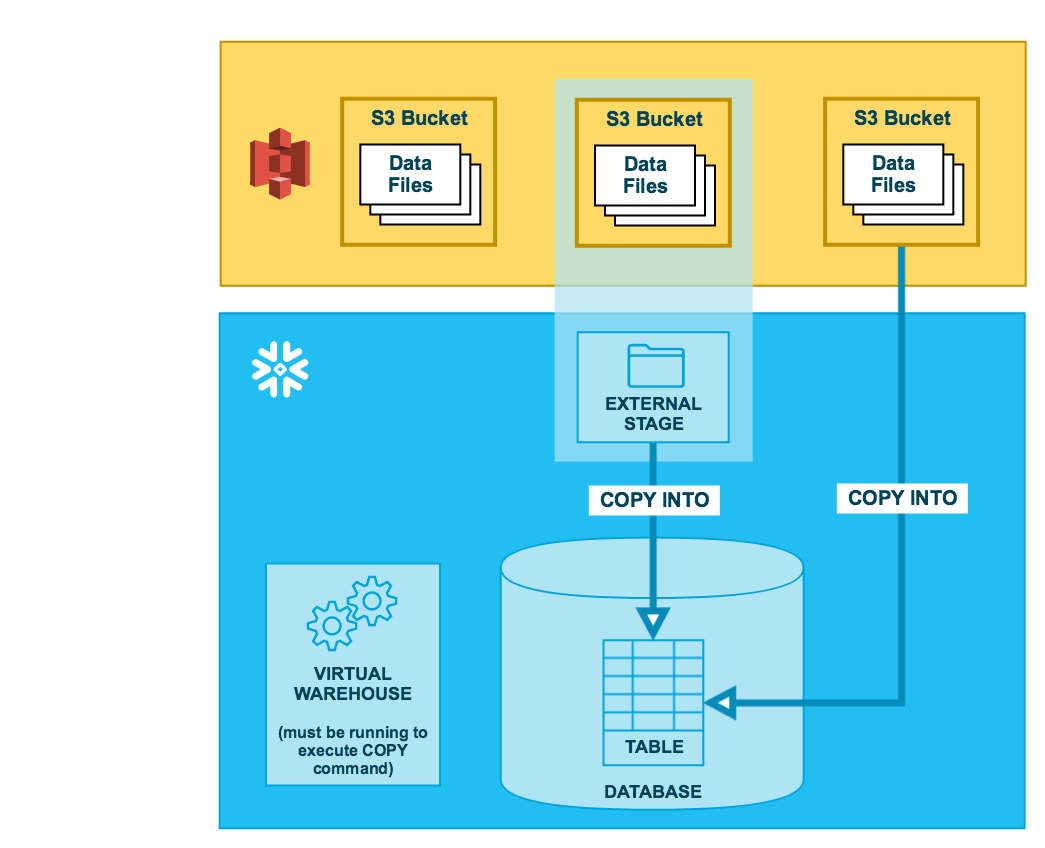
Now let’s look at an example for utilizing a S3 bucket with data.
1
2
3
4
5
6
7
8
9
10
11
create or replace file format sf_tut_csv_format
 type = ‘CSV’
 field_delimiter = ‘|’
 skip_header=1;

create or replace stage sf_tut_contacts_stage
 file_format = sf_tut_csv_format
 url = ‘s3://snowflake-docs’;

—- Now lets look at this staging area
list @sf_tut_contacts_stage;
Sample Queries
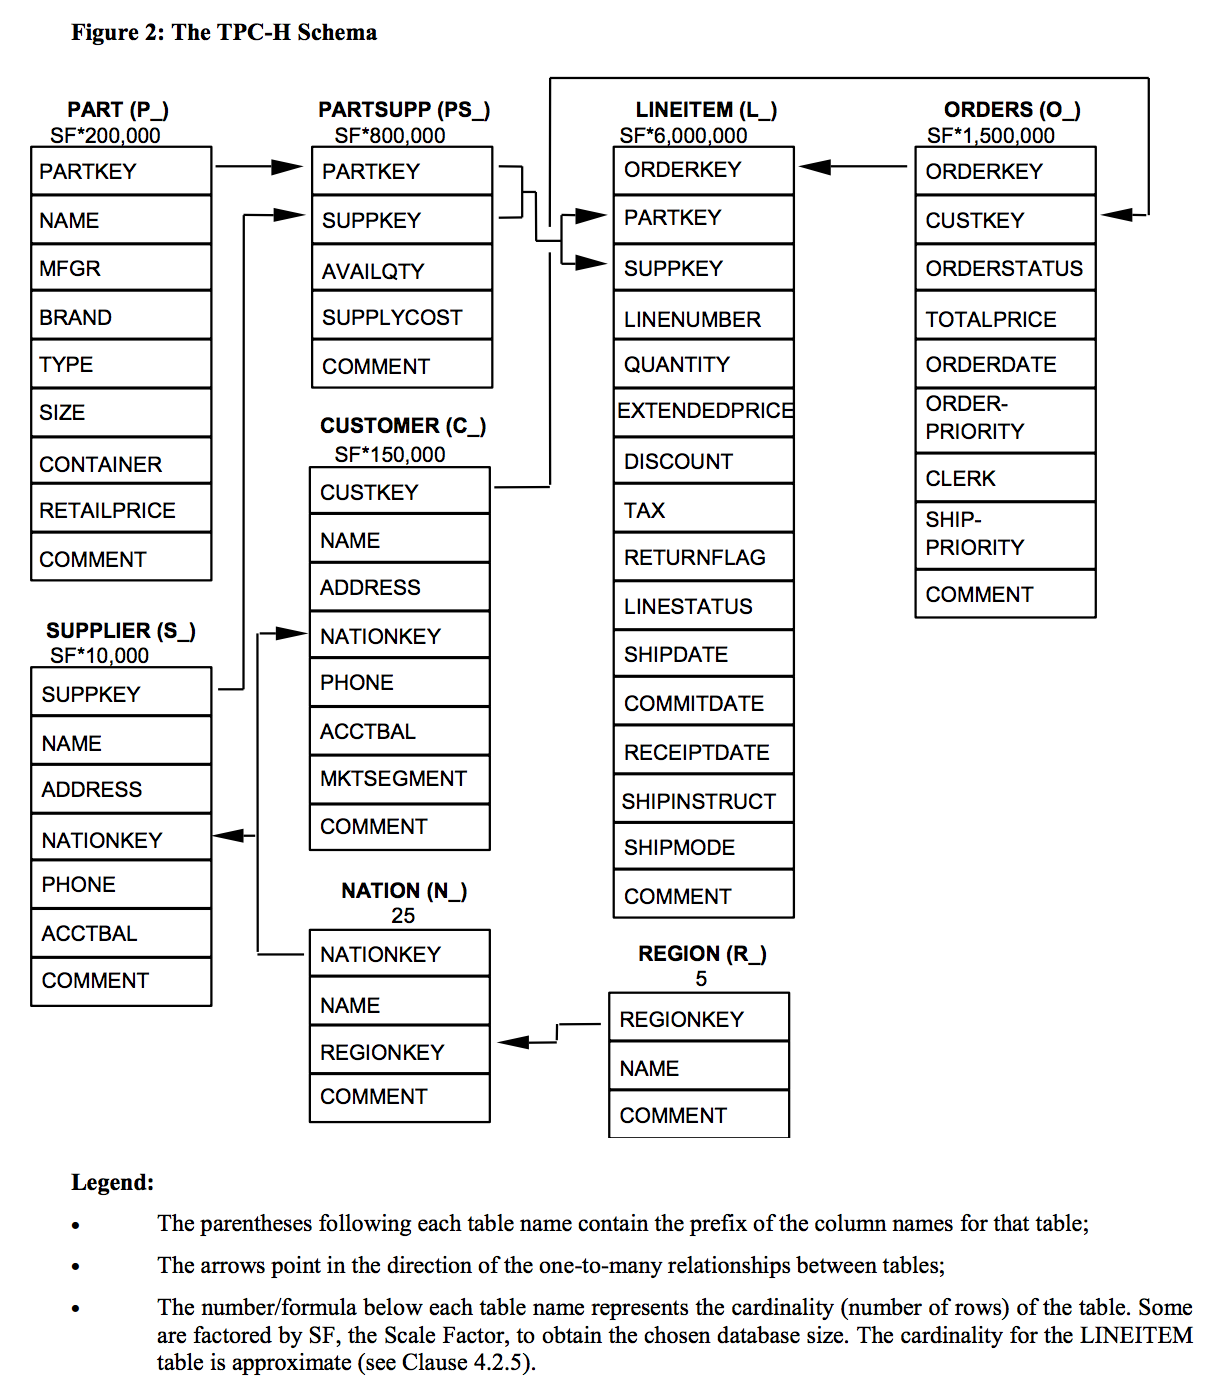
We would be using sample database TPC-H bundled with Snowflake for this section. The components of TPC-H consist of eight separate and individual tables (the Base Tables). The relationships between columns in these tables are illustrated in the following ER diagram:
Now let’s do some BI on the sample data.
Q1: Pricing Summary Report Query
This query reports the amount of business that was billed, shipped, and returned.
Business Question
The Pricing Summary Report Query provides a summary pricing report for all line items shipped as of a given date. The date is within 60-120 days of the greatest ship date contained in the database.
Here is the query,
1
2
3
4
5
6
7
8
9
10
11
12
13
14
15
16
17
18
19
20
21
22
23
use schema snowflake_sample_data.tpch_sf1;   -- or snowflake_sample_data.{tpch_sf10 | tpch_sf100 | tpch_sf1000}

select
       l_returnflag,
       l_linestatus,
       sum(l_quantity) as sum_qty,
       sum(l_extendedprice) as sum_base_price,
       sum(l_extendedprice * (1-l_discount)) as sum_disc_price,
       sum(l_extendedprice * (1-l_discount) * (1+l_tax)) as sum_charge,
       avg(l_quantity) as avg_qty,
       avg(l_extendedprice) as avg_price,
       avg(l_discount) as avg_disc,
       count(*) as count_order
 from
       lineitem
 where
       l_shipdate <= dateadd(day, -90, to_date('1998-12-01'))
 group by
       l_returnflag,
       l_linestatus
 order by
       l_returnflag,
       l_linestatus;
For more information on this dataset, refer to Sample Data: TPC-H
FAQ
- What is the difference between securityadmin and sysadmin roles. Why do we get a sysadmin default.
-
ACCOUNTADMIN (aka Account Administrator)
-
Role that encapsulates the SYSADMIN and SECURITYADMIN system-defined roles. It is the top-level role in the system and should be granted only to a limited/controlled number of users in your account.
-
SECURITYADMIN (aka Security Administrator)
- Role that can create, monitor, and manage users and roles. More specifically, this role is used to:
- Create users and roles in your account (and grant those privileges to other roles).
- Modify and monitor any user, role, or session.
- Modify any grant, including revoking it.
-
SYSADMIN (aka System Administrator)
- Role that has privileges to create warehouses and databases (and other objects) in an account.
- If, as recommended, you create a role hierarchy that ultimately assigns all custom roles to the SYSADMIN role, this role also has the ability to grant privileges on warehouses, databases, and other objects to other roles.
-
PUBLIC
- Pseudo-role that is automatically granted to every user and every role in your account. The PUBLIC role can own securable objects, just like any other role; however, the objects owned by the role are, by definition, available to every other user and role in your account.
- This role is typically used in cases where explicit access control is not needed and all users are viewed as equal with regard to their access rights.